In the vast digital tapestry of YouTube, where content reigns supreme, the final stitch that holds your masterpiece together is frequently enough overlooked: the export settings. Whether you’re a seasoned creator or a budding filmmaker, mastering DaVinci Resolve’s export settings can be the difference between a video that dazzles and one that disappoints. It’s not just about clicking “Export” and hoping for the best—it’s about understanding the nuances that ensure your vision translates seamlessly onto screens worldwide. From bitrates to codecs, resolution to color spaces, every choice you make shapes how your audience experiences your work. Dive in as we unravel the secrets to flawless YouTube uploads, ensuring your content shines as brightly as you intended.
Understanding DaVinci Resolve Export Presets for Optimal Video Quality
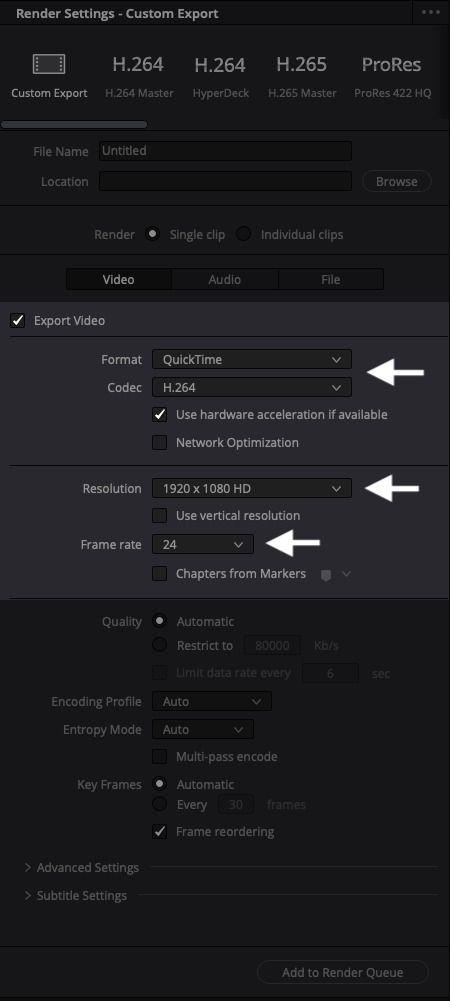
When exporting your videos in DaVinci Resolve, selecting the right preset is crucial for ensuring your content looks professional on YouTube. The platform’s compression algorithms can drastically affect video quality, so choosing optimal settings is key. DaVinci Resolve offers a range of presets, but the YouTube 1080p and YouTube 4K options are particularly useful. These presets are tailored to balance quality and file size, making them ideal for most creators.However, tweaking these settings slightly can further enhance your results:
- Set the Codec to H.264 for compatibility and efficient compression.
- Adjust the Bitrate to match your resolution—12-16 Mbps for 1080p and 35-45 Mbps for 4K ensures crisp visuals.
- Enable Hardware Encoding if available,to speed up the export process without sacrificing quality.
| Resolution | Recommended Bitrate | Codec |
|---|---|---|
| 1080p (Full HD) | 12-16 Mbps | H.264 |
| 4K (ultra HD) | 35-45 Mbps | H.264 |
Beyond resolution and bitrate,pay attention to frame rate and aspect ratio to align with YouTube’s standards. Match your timeline settings to your export settings to avoid unnecessary scaling. Additionally, consider using the Quick Export feature for fast deliveries, but always review the output before uploading. By mastering these export settings, you can ensure your videos retain their intended clarity and impact, even after YouTube’s compression.
Choosing the Right Resolution and Frame Rate for YouTube Compatibility
When preparing your video for YouTube, resolution and frame rate are critical factors that determine its visual quality and playback smoothness. Opt for 1080p (Full HD) as the standard resolution, as it strikes a balance between quality and file size, ensuring your video looks crisp without causing excessive buffering for viewers. For higher-quality content, especially for cinematic or detail-heavy videos, consider 4K (2160p), wich YouTube fully supports. As for frame rate,30fps is ideal for most videos,providing a natural look,while 60fps is perfect for action-packed or fast-paced content,offering smoother motion.
Understanding YouTube’s recommended settings ensures your video maintains its integrity post-upload. here’s a quick reference table for optimal choices:
| Resolution | frame Rate | Best Use Case |
|---|---|---|
| 1080p (Full HD) | 30fps | Standard videos, vlogs, tutorials |
| 1080p (Full HD) | 60fps | Gaming, sports, fast action |
| 4K (2160p) | 30fps | Cinematic, detail-rich content |
| 4K (2160p) | 60fps | High-quality action or slow-motion shots |
Optimizing Bitrate and Codec Settings for Crisp visuals and Smaller File Sizes
When exporting your project in DaVinci Resolve, striking the perfect balance between visual quality and file size is essential for YouTube uploads. Start by selecting the H.264 or H.265 codec, both of which are widely supported and efficient. For 1080p videos, a bitrate of 10-12 Mbps ensures crisp visuals without unnecessary bloat. For 4K content, aim for 25-35 Mbps to maintain detail while keeping the file size manageable. Additionally, enabling two-pass encoding optimizes the compression process, ensuring smoother playback and better quality.
Consider these key settings for optimal results:
- Resolution: match your project settings (e.g., 1920×1080 or 3840×2160).
- Frame Rate: Export at the same frame rate used during editing to avoid inconsistencies.
- Key Frames: Set to Automatic for seamless transitions.
- Audio: Use AAC codec at 320 kbps for clear, high-quality sound.
| Resolution | Recommended Bitrate |
|---|---|
| 1080p | 10-12 Mbps |
| 4K | 25-35 Mbps |
By fine-tuning these settings, you’ll achieve professional-looking videos that load quickly and look stunning on YouTube, ensuring your content stands out in a crowded digital landscape.
Fine-Tuning Audio Export Settings to Ensure Seamless Playback on YouTube
when preparing your video for YouTube, fine-tuning the audio export settings in DaVinci Resolve is crucial for ensuring a professional and seamless viewing experience.youtube’s compression algorithms can significantly alter your audio quality if the settings aren’t optimized. Here’s what you need to focus on:
- Audio Codec: Use AAC (Advanced Audio Codec) for compatibility and balance between quality and file size.
- Bitrate: Aim for a bitrate of 320 kbps for stereo audio to maintain clarity without excessive file size.
- Sample Rate: Stick to 48 kHz, the industry standard for video, to ensure smooth playback.
Additionally, balancing your audio levels before export is essential. YouTube normalizes audio to -14 LUFS (Loudness Units Full Scale), so ensure your mix is close to this target to avoid sudden volume shifts. Use DaVinci’s Fairlight tab to:
| Tool | Function |
|---|---|
| loudness Meter | Monitor and adjust audio levels to match YouTube’s LUFS standard. |
| Limiter | Prevent audio clipping and ensure consistent volume. |
To Wrap It Up
Outro:
And there you have it—your ultimate guide to mastering davinci Resolve’s export settings for flawless YouTube uploads! With these tips in your toolkit, you’re ready to render crisp, high-quality videos that shine on any screen. No more guesswork, no more pixelated playback—just smooth, professional results every time.
Now,hit export with confidence and let your creativity take center stage. Happy editing, and may your uploads always be buffer-free! 🎬✨
(Got any pro export tricks of your own? Drop them in the comments—we’d love to hear your secrets!)
