Welcome to the digital age,where YouTube reigns as the ultimate hub for video content,from tutorials to entertainment.But what happens when your device’s video card becomes more of a hindrance than a help? Whether you’re troubleshooting performance issues, conserving battery life, or simply exploring advanced settings, knowing how to disable your video card can be a game-changer.In this guide,we’ll walk you through the steps to master this process with ease,ensuring your YouTube experience remains seamless adn tailored to your needs. Let’s dive into the world of tech-savvy solutions and unlock the full potential of your viewing experience.
Understanding the Role of Video Cards in YouTube Playback
Video cards, also known as GPUs, play a pivotal role in ensuring smooth YouTube playback by handling the rendering of high-quality videos. They decode and process video streams, reducing the load on your CPU and enhancing overall performance. However, there are scenarios where disabling the video card might be necessary, such as troubleshooting playback issues, reducing power consumption, or testing system performance without GPU acceleration.
To disable your video card effectively, follow these steps:
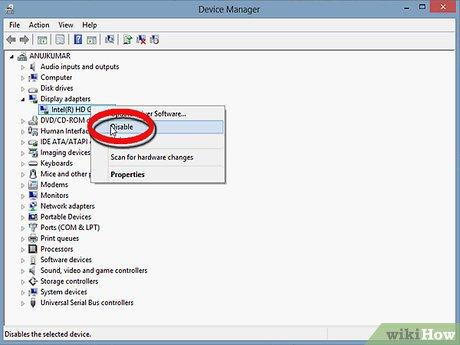
- Access Device Manager: Open the Device Manager on your Windows system to locate your GPU.
- Disable the GPU: Right-click on the video card and select “Disable device” to turn it off temporarily.
- Test Playback: Open YouTube and check if the video plays correctly without GPU acceleration.
| Scenario | Action |
|---|---|
| Playback Lag | Disable GPU to test CPU-only performance. |
| Power Saving | Turn off GPU to reduce energy usage. |
| Driver Issues | Disable GPU to troubleshoot driver conflicts. |
Understanding when and how to disable your video card can help you optimize YouTube playback and resolve technical issues efficiently. Always remember to re-enable the GPU after testing to restore full system functionality.
Step-by-Step Guide to Disabling Video Cards for Optimal Performance
Disabling your video card can significantly enhance performance for specific tasks,such as optimizing YouTube streaming on older systems. To get started, open your Device Manager by pressing Win + X and selecting it from the menu. Locate the “Display adapters” section, right-click your video card, and choose “Disable device”. This simple action can free up system resources, especially when your machine struggles with GPU-heavy processes. Remember to save your work before proceeding,as this step may cause your screen to flicker or temporarily go black.
For advanced users, utilizing the BIOS or UEFI interface offers a more permanent solution. Restart your computer and press the designated key (often F2, Delete, or Esc) to access the settings. Navigate to the “Integrated Peripherals” or “Advanced” tab, find the video card settings, and disable it. This method is especially useful for those running dual-GPU setups or aiming to reduce power consumption. Below is a quick reference table for common BIOS keys:
| Manufacturer | Key |
|---|---|
| Dell | F2 |
| HP | Esc or F10 |
| Lenovo | F1 or F2 |
| Asus | Delete |
Common Issues and Troubleshooting Tips When Disabling video Cards
Disabling a video card can sometimes lead to unexpected issues, especially if you’re not familiar with the process.One common problem is the display going blank after disabling the card. This often happens because the system fails to switch to an choice display adapter. To resolve this, ensure you have an integrated GPU or another graphics card enabled before proceeding. Another frequent issue is driver conflicts, where the system struggles to manage multiple graphics drivers. Uninstalling the old drivers before disabling the card can help avoid this.
Here are some additional troubleshooting tips to keep in mind:
- Check BIOS settings: Ensure the integrated GPU is enabled if you’re switching from a dedicated card.
- Update drivers: Always use the latest drivers for your integrated or secondary GPU.
- Monitor temperatures: Disabling a video card can affect system cooling; keep an eye on hardware temperatures.
| Issue | Solution |
|---|---|
| No display output | Enable integrated GPU in BIOS |
| Driver conflicts | Uninstall old drivers before disabling |
| System overheating | Monitor and adjust cooling solutions |
Enhancing YouTube experience with Advanced settings and Alternatives
Discovering how to disable video cards on YouTube can significantly optimize your viewing experience, especially if you’re dealing with hardware limitations or unwanted visual distractions. By accessing advanced browser settings or utilizing developer tools, you can temporarily turn off GPU acceleration. This not only reduces the strain on your system but also ensures smoother playback on devices with lower specifications. Additionally, exploring alternative platforms like Invidious or FreeTube can provide ad-free, privacy-focused streaming options, giving you more control over your youtube consumption.
Here are some quick tips to enhance your YouTube experience:
- Disable GPU Acceleration: Navigate to your browser’s settings and turn off hardware acceleration for better performance.
- Use Developer Tools: Temporarily disable video cards by inspecting the element and tweaking its properties.
- Try Alternatives: Platforms like Invidious offer lightweight, ad-free streaming without compromising on quality.
| Method | Benefit |
|---|---|
| Disable GPU Acceleration | Reduces system load |
| Developer Tools | Customizable video settings |
| alternative Platforms | Ad-free, privacy-focused viewing |
In Summary
And there you have it—disabling video cards on YouTube doesn’t have to be a tech labyrinth.With these straightforward steps, you’re now equipped to tailor your viewing experience to your needs, whether it’s for troubleshooting, optimizing performance, or simply experimenting with settings.Remember, mastering YouTube is all about making the platform work for you, not the other way around. So go ahead, take control, and let your creativity—or your binge-watching—flow seamlessly. Happy streaming!
