Introduction
In the ever-evolving digital landscape, YouTube has become a cornerstone of online expression, entertainment, and education. For manny, it’s a platform to share passions, build communities, and even forge careers. But what happens when the time comes to step away? Whether you’re seeking a fresh start, prioritizing privacy, or simply decluttering your digital footprint, deleting your YouTube channel is a significant decision—one that requires careful thought and a clear roadmap.
This step-by-step guide is designed to walk you through the process of permanently deleting your YouTube channel, ensuring you understand the implications and execute the steps with confidence. From backing up your content to navigating YouTube’s settings, we’ll cover everything you need to no to bid farewell to your channel—forever. ready to take the leap? Let’s dive in.
Understanding the implications of Deleting Your YouTube Channel
Deleting your YouTube channel is a significant decision that comes with lasting consequences. Once you proceed, all your videos, comments, playlists, and subscribers will be permanently removed. This action cannot be undone, so it’s crucial to understand what you’re giving up. For creators, this means losing access to years of content and the audience you’ve built. Additionally, any associated analytics, custom URLs, and channel branding will vanish. If your channel is linked to a Google Ads account or other services, those connections will also be severed.
Before taking the plunge, consider the following:
- Backup your data: Download your videos, comments, and analytics to preserve your work.
- Inform your audience: Let your subscribers know about your decision to avoid confusion.
- Evaluate alternatives: Explore options like unlisting videos or temporarily disabling the channel instead of deleting it.
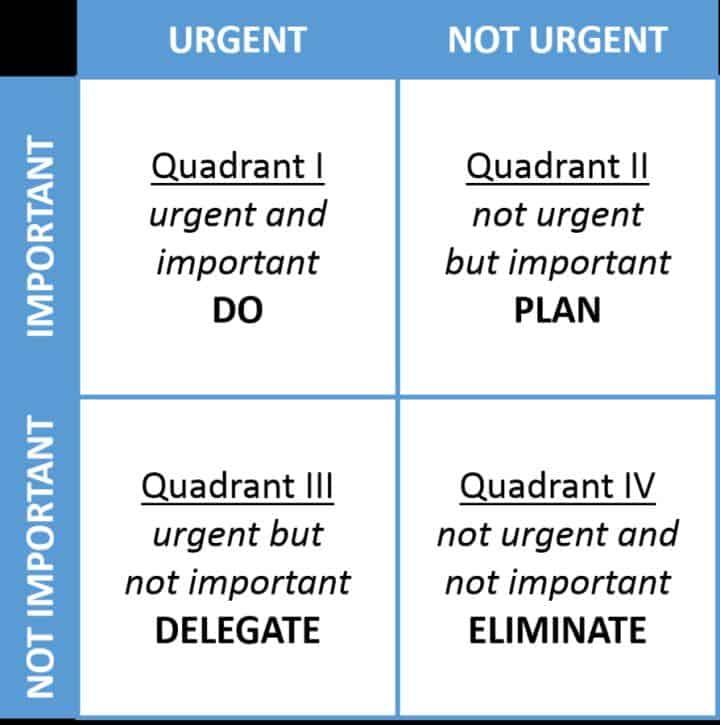
| Action | Impact |
|---|---|
| Delete Channel | Permanent loss of all content and data |
| Unlist Videos | Content remains accessible via direct links |
| Disable Channel | Temporary deactivation with option to restore |

Preparing your Channel and Content for Permanent Removal
Before taking the irreversible step of deleting your YouTube channel, ensure you’ve safeguarded your valuable content and audience connections. Back up everything—download your videos, save analytics reports, and export subscriber lists if needed. Additionally, consider:
- Notifying your subscribers through a final post or email to maintain transparency.
- Updating linked platforms where your YouTube content is embedded or promoted.
- Clearing monetization details, such as disconnecting AdSense or third-party sponsorships.
| Action | Why It Matters |
|---|---|
| download videos | Preserve your creative work for future use. |
| Revoke access | Remove third-party tools linked to your channel. |
Once your data is secure, proceed with the deletion process via YouTube Studio. Navigate to Settings > Channel > Advanced Settings, and select “Remove YouTube Content.” Confirm your choice carefully—this action erases all videos, comments, and playlists permanently. Double-check connected accounts,as deleting a YouTube channel may also affect associated google services like Gmail or Drive if using the same login.
Navigating YouTube’s Deletion Process Step by Step
Deleting your YouTube channel is a permanent decision, and understanding the process is crucial to avoid accidental removal. Begin by signing into your YouTube account and navigating to YouTube Studio. From there, click on Settings in the left-hand menu, followed by Channel > Advanced Settings. Scroll down to find the option to Remove YouTube Content. Here, you’ll need to confirm your intentions before proceeding.
| Step | Action |
|---|---|
| 1 | Navigate to YouTube studio |
| 2 | Access Settings > Channel > Advanced Settings |
| 3 | Click “Remove YouTube content” |
Before you finalize the deletion, ensure you’ve downloaded any important data, such as videos, comments, or analytics, using Google Takeout. Once confirmed, your channel will be permanently erased, including all uploads, subscriptions, and comments. Keep in mind that this action is irreversible, so double-check your decision. If you’re unsure,consider hiding your channel temporarily instead of deleting it forever.
Ensuring a Clean Break: Post-Deletion Considerations
Once your YouTube channel is deleted,it’s essential to ensure a clean break and address any lingering concerns. Start by reviewing your Google Account to confirm that all associated data, such as watch history, search history, and saved playlists, is also removed if desired. This step ensures no residual traces of your channel remain.Additionally, consider downloading your data beforehand if you want to keep a personal archive of your videos, comments, or analytics. This can be done through Google Takeout, which allows you to export your information in a few simple steps.
Next, take a moment to notify your audience if necessary. If you had a loyal following, a brief announcement on other social media platforms can help manage expectations and maintain transparency. Here’s a quick checklist to wrap up:
- Double-check your Google Account settings for any remaining channel data.
- Download your content via Google Takeout if you want a backup.
- Inform your audience about the deletion to avoid confusion.
| Action | Purpose |
|---|---|
| Review Google Account | Ensure no residual data remains |
| Download Data | Create a personal archive |
| Notify Audience | Maintain transparency |
The Way forward
Outro:
And that’s it—your YouTube channel is now history. Whether you’re making space for something new or simply stepping away, you’ve taken control of your digital footprint.Remember, once it’s gone, it’s really gone—so double-check before hitting that final delete.
If you ever decide to return, YouTube will be waiting (with a fresh start). Until then, happy unplugging! 🚀
